


A professional manicure is one of life’s small luxuries—but regular salon visits can be expensive and time-consuming. The good news? You can achieve salon-quality results right from the comfort of your home with a little patience, the right tools, and proper technique. Whether you’re prepping for a special occasion or maintaining weekly self-care, a DIY manicure can leave your hands looking polished, elegant, and healthy.
In this guide, you’ll learn a step-by-step routine to create a flawless manicure at home—without the salon price tag. We’ll also discuss tools, nail care essentials, and how the same attention to detail you apply to skincare (like using Affordable Anti-Aging Products Under $20) can extend to hand and nail care too.
Benefits of At-Home Manicures
- Cost-effective: Save money in the long run.
- Time-saving: Do it on your schedule.
- Customizable: Choose your preferred polish, shape, and care products.
- Hygienic: You control cleanliness and sanitation.
Step-by-Step: How to Get a Salon-Quality Manicure at Home
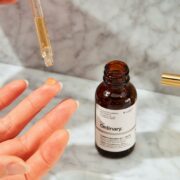
Step 1: Gather Your Tools
| Tool/Product | Purpose |
|---|---|
| Nail polish remover | Cleans old polish and oils |
| Nail file and buffer | Shapes and smooths nail surface |
| Cuticle pusher | Pushes back cuticles gently |
| Cuticle remover/oil | Softens or dissolves cuticle buildup |
| Hand exfoliator | Removes dead skin |
| Base coat | Protects nails and smooths surface |
| Nail polish (color of choice) | Adds color and finish |
| Top coat | Seals polish and adds shine |
| Hand cream | Moisturizes hands |
| Optional: Nail clippers, cuticle nippers, gloves |
Step 2: Remove Old Polish
Start with a clean slate. Use a gentle, acetone-free nail polish remover to avoid drying out your nails and cuticles.
Step 3: Soak Your Hands
Soak your fingers in warm, soapy water for 5–7 minutes. This softens the skin and cuticles and makes exfoliation easier.
Step 4: Exfoliate Hands
Use a gentle hand scrub or make your own with sugar and olive oil. Focus on dry areas and knuckles. Rinse and pat dry.
Step 5: Shape and Buff Nails
Trim if necessary, then use a file to shape your nails. Popular shapes include oval, square, or almond. Use a buffer to smooth the surface and remove ridges, but don’t overdo it—gentle is best.
Step 6: Treat Cuticles
Apply a cuticle remover and let it sit for a minute. Gently push back cuticles using a cuticle stick. Trim only hangnails, never the actual cuticle, to avoid infection.
Step 7: Moisturize Hands and Nails
Apply a nourishing hand cream and massage it into your skin. Allow time for it to absorb, or gently wipe nails with polish remover before applying polish.
Pro tip: Just like using Affordable Anti-Aging Products Under $20 can keep facial skin youthful without breaking the bank, investing in a quality hand cream and cuticle oil can dramatically improve the appearance of your hands over time.
Step 8: Apply Base Coat
A base coat helps polish adhere better and protects nails from staining. Apply a thin layer and let it dry completely.
Step 9: Apply Nail Polish (2 Coats)
Choose a high-quality polish, even if you only own a few shades. Apply the first coat thinly and wait for it to dry. Apply a second coat for better color payoff.
Step 10: Seal with a Top Coat
Top coat adds shine and protects your polish from chipping. For a gel-like finish, look for top coats that offer long-wear or plumping effects.
Step 11: Clean the Edges
Use a small brush or Q-tip dipped in nail polish remover to clean around the nail edges for a neat, professional look.
Step 12: Let Nails Dry Completely
Don’t rush this step. Avoid using your hands for at least 15–20 minutes. Optional: Use a quick-dry spray or place hands under a fan for faster drying.
Pro Tips for Long-Lasting Results
| Tip | Benefit |
|---|---|
| Apply thin layers of polish | Prevents bubbling and smudging |
| Cap the nail tips | Seals color and prevents chipping |
| Avoid hot water after polishing | Helps polish set and last longer |
| Reapply top coat after 2-3 days | Extends wear time |
| Wear gloves during chores | Protects your manicure |
Recommended Budget-Friendly Nail Care Products
| Product | Purpose | Price Range |
|---|---|---|
| Sally Hansen Hard As Nails | Strengthens weak nails | Under $5 |
| Essie Base & Top Coat | Polish protection and shine | Under $10 |
| Burt’s Bees Lemon Cuticle Cream | Nourishes dry cuticles | Under $7 |
| e.l.f. Nourishing Hand Cream | Hydrates and softens hands | Under $6 |
| Wet n Wild Nail Polish | Affordable polish, wide shades | Under $3 |
Frequently Asked Questions (FAQs)
How often should I do an at-home manicure?
Every 1–2 weeks is ideal to maintain nail health and polish freshness.
Can I use regular kitchen ingredients for exfoliating?
Yes! Sugar, olive oil, and honey make excellent DIY scrubs for hands.
What if I don’t have a cuticle remover?
You can soak your hands longer in warm water or use coconut oil to soften the cuticles.
How can I make my manicure last longer?
Apply thin polish layers, seal the tips, avoid hot water for 24 hours, and reapply top coat every few days.
Is gel polish better for at-home manicures?
Gel polish lasts longer but requires a UV/LED lamp. For beginners, regular polish is simpler and safer to use.
Final Thoughts
You don’t need a professional appointment to achieve beautiful, well-groomed nails. With the right tools and a bit of patience, learning how to get a salon-quality manicure at home is both easy and rewarding. It’s a chance to unwind, care for yourself, and look polished—literally—without leaving your house.
Just like using Affordable Anti-Aging Products Under $20 can help maintain youthful skin on a budget, investing time in your hand and nail care pays off in confidence and presentation. So gather your tools, pick your polish, and treat yourself to a flawless DIY manicure today.