


Learning how to contour round face shape naturally can help enhance your features while maintaining a soft, effortless appearance. A round face typically has full cheeks, a rounded jawline, and similar width and length proportions. The goal of contouring is not to change your face shape but to add subtle definition and create balanced dimensions.
This guide covers natural contour techniques, product choices, placement tips, a helpful table, and frequently asked questions to help you achieve a beautifully sculpted look.
Understanding a Round Face Shape
Before you begin contouring, identify the key features of a round face:
- Fuller cheeks
- Soft jawline
- Minimal angles
- Similar width and height
When learning how to contour round face shape naturally, the main objective is to create the illusion of length and subtle structure.
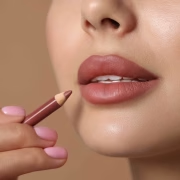
Choosing the Right Contour Products
To keep the look natural, select products that are only one or two shades darker than your skin tone.
Best Product Types:
- Cream contour for a dewy finish
- Powder contour for oily skin
- Contour stick for easy blending
- Matte bronzer (cool-toned preferred)
Avoid overly dark or orange shades, as they can look harsh and unnatural.
Step-by-Step Guide: How to Contour Round Face Shape Naturally
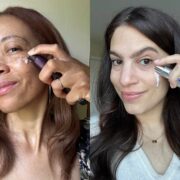
Step 1: Prep Your Skin
Start with clean, moisturized skin. Smooth skin texture enhances blending, which is essential for natural contouring. Maintaining good skincare habits, like using the Best Exfoliator for Sensitive Skin at Home, helps create an even base for makeup application.
Apply foundation or tinted moisturizer evenly before contouring.
Step 2: Contour the Cheekbones
To slim a round face:
- Suck in your cheeks slightly to find the natural hollow
- Apply contour just below the cheekbone
- Blend upward, not downward
Blending upward lifts the face and prevents a dragged-down appearance.
Step 3: Contour the Temples and Forehead
Apply contour lightly along the temples and upper sides of the forehead. This creates the illusion of a narrower face.
Keep the center of your forehead lighter to maintain brightness.
Step 4: Define the Jawline
Apply a thin line of contour along the jawline and blend downward toward the neck. This creates subtle definition and reduces the appearance of roundness.
Avoid thick or heavy lines.
Step 5: Slim the Nose (Optional)
If desired, apply a very light contour along the sides of the nose and blend well for a natural finish.
Step 6: Highlight Strategically
Highlighting is just as important as contouring.
Apply highlighter to:
- Center of the forehead
- Bridge of the nose
- Top of cheekbones
- Chin
This contrast enhances the sculpted effect.
Contour Placement Guide for Round Face
| Face Area | Where to Apply Contour | Blending Direction | Purpose |
|---|---|---|---|
| Cheekbones | Below cheekbone hollow | Upward toward temples | Creates definition |
| Forehead | Temples and outer edges | Inward | Narrows face |
| Jawline | Along jaw edge | Down toward neck | Sharpens jaw |
| Nose (optional) | Along sides | Inward | Slimming effect |
| Under Chin | Light shadow under chin | Downward | Adds depth |
Following proper placement is essential when mastering how to contour round face shape naturally.
Tips for a More Natural Finish
- Use a damp makeup sponge for seamless blending
- Choose matte products to avoid unwanted shine
- Apply light layers instead of heavy strokes
- Blend thoroughly to eliminate harsh lines
- Set lightly with translucent powder
The key is subtle enhancement, not dramatic reshaping.
Cream vs Powder Contour for Round Faces
Cream Contour
- Best for dry or normal skin
- Gives a natural, skin-like finish
- Easier to blend for beginners
Powder Contour
- Ideal for oily skin
- Longer-lasting
- Offers more control for precise definition
Choose according to your skin type and desired finish.
Common Mistakes to Avoid
- Applying contour too low on the cheeks
- Using shades that are too dark
- Skipping blending
- Over-highlighting
- Contouring the entire face heavily
Natural contouring is about soft shadows and balance.
How to Balance Contour with Blush
For round faces, apply blush slightly higher on the cheeks and blend toward the temples. Avoid placing blush directly on the apples of the cheeks, as this can emphasize roundness.
Soft peach, rose, and muted pink shades work best for a balanced look.
Minimal Everyday Contour Routine
If you prefer a simple look:
- Light contour under cheekbones
- Soft temple shading
- Subtle jawline definition
- Light highlighter on cheekbones
This quick routine enhances structure without looking heavy.
Frequently Asked Questions (FAQs)
1. Can I contour a round face without bronzer?
Yes. Use a cool-toned contour powder or cream instead of bronzer for more natural shadowing.
2. Should round faces avoid blush on the apples?
It’s better to apply blush slightly higher and blend outward to create lift.
3. How do I make my face look slimmer naturally?
Focus contour under cheekbones, along temples, and lightly on the jawline. Keep the center of the face bright.
4. Is cream contour better for beginners?
Yes, cream formulas are easier to blend and look more natural if applied lightly.
5. Do I need to contour every day?
No. For daily wear, you can use light bronzer and blush instead of full contouring.
Final Thoughts
Understanding how to contour round face shape naturally is about enhancing your features while maintaining a soft, realistic finish. With proper placement, light application, and seamless blending, you can create subtle definition that slims and sculpts without looking overdone.